Hands-On Investigations for Teaching Properties of Air

I remember the first time I had to teach the properties of air. I was thinking, what's to teach? Air is just air, right? After a lot of research I realized there are many things students need to learn about air. Here are five simple, hands-on investigations students can do to learn about air.


Adult supervision is recommended for all activities. Parents and teachers should evaluate each activity for the age, ability, and needs of their children. By participating, you assume responsibility for any risks associated with the activity


Time: 30 minutes (for all 5 investigations)


Investigation #1
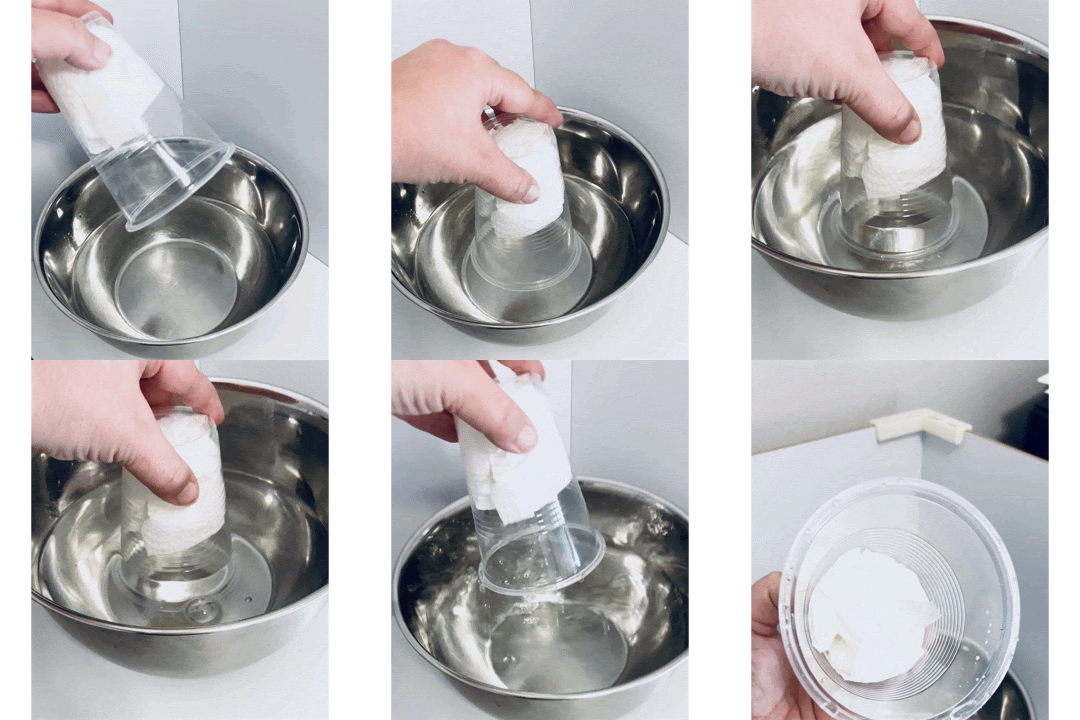
An upside cup being pushed in water to demonstrate that air takes up space

Objective: Students will understand that air surrounds us.


Materials:

Clear plastic cups

Paper towels

Large bowl of water


Steps:

  1. Crumple up a few paper towels into a clear plastic cup.
  2. Turn the cup upside down.
  3. Place the cup in water.

Students will observe:

  • It's difficult to push the cup all the way down. This is because there is air in the cup that is taking up space, there is no place for the water to go!


Questions to pose to students:

  1. Why can't you push the cup all the way down?
  2. What could you change to make the water go up in the cup?

Investigation #2

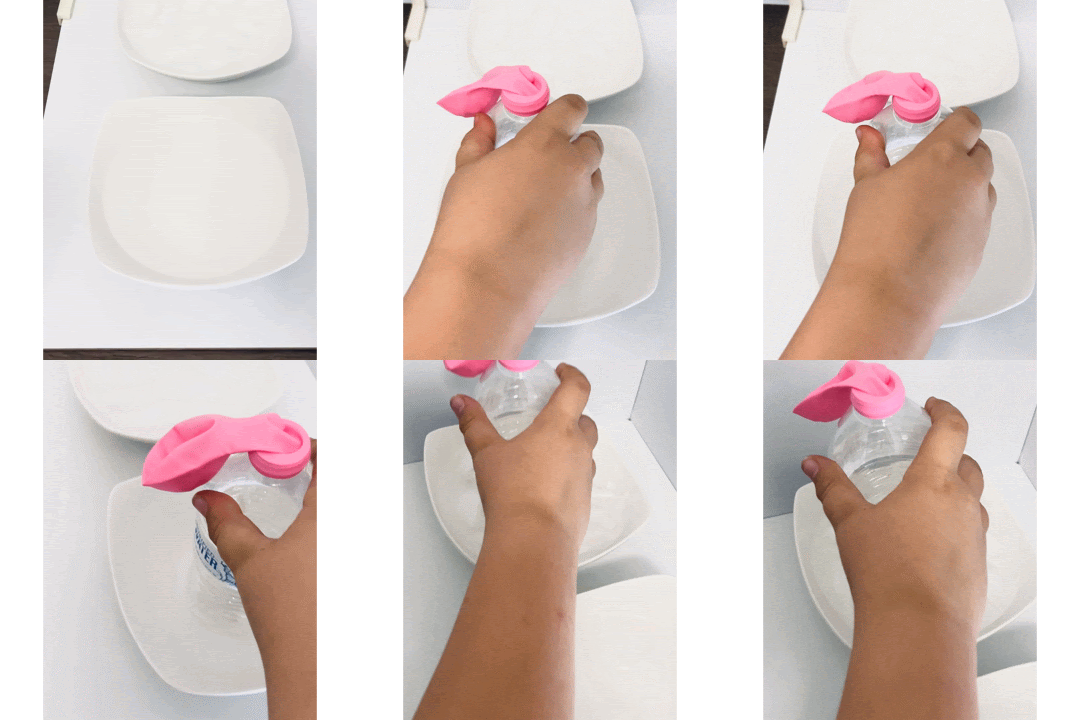
Empty water bottle with a balloon on top moving from hot water to cold water.

Objective: Students will understand that air takes up space.


Materials:

Empty water bottle

Balloon

Bowl of ice water

Bowl of warm water


Steps:

  1. Put a ballon on the top of an empty water bottle.
  2. Place the empty water bottle in the bowl of warm water.
  3. Then move the water bottle to the ice water. 

Students will observe:

  • When the bottle is place in the cold water the balloon deflates quicky.
  • When the bottle is placed in the warm water the balloon inflates slightly - the warmer the water is the more it will inflate. If using hot water, have an adult demonstrate that part.


Questions to pose to students:

  • When the bottle inflates, what is causing it to inflate? Where is the air coming from?
  • When the bottle deflates, what is causing it to deflate? Where is the air going?


Investigation #3

Objective: Students will understand that air takes up space.


Materials:

Syringe (with no needle)


Steps:

  1. Students will pull back the syringe.
  2. Place the tip of the syringe (no needle) against the palm of their hand.
  3. Try to push the plunger down.


Students will observe:

  • It will be very difficult to push the plunger when their hand is blocking the opening.


Questions to pose to students:

  1. Why can't you push the plunger down any farther?
  2. What could you change to make it so you could push the plunger down farther?

Investigation #4

Objective: Students will understand that air is all around us and take up space.


Materials:

An inflated beach ball

A deflated beach ball


Steps:

  1. Students will pick up the deflated ball and make observations.
  2. Students will pick up the inflated ball and make observations (noticing how it can't put pushed all the way down).


Students will observe:

  • That they cannot push the inflated beach ball all the way down.
  • There appears to be a small amount of air inside the deflated beach ball.


Questions to pose to students:

  1. Why can't you push the inflated beach ball all they way down?
  2. What could you do to make it so you could push the beach ball all the way down?


Investigation #5

A digital scale with a deflated balloon on it.

Objective: Students will understand that air has mass.


Materials:

Deflated Balloon

Inflated Balloon

Digital Scale


Steps:

  1. Weigh the deflated balloon.
  2. Weigh the inflated balloon.
  3. Compare the mass between the two balloons.

Students will observe:

  • Students will see a slight difference in the mass (about 1 gram).


Questions to pose:

  1. How much more does the inflated balloon weigh?
  2. What is causing the difference in mass?

FAQ

What materials did you use?

You don't need to use the exact materials we've listed—similar items will often work just as well. We've included links to products we've used and liked in case they're helpful while gathering supplies.


  • Clear plastic cups
  • Paper towels
  • Large bowl of water
  • Empty water bottle
  • Balloon
  • Bowl of ice water
  • Bowl of warm water
  • Syringe* (with not needle)
  • Beach Balls*
  • Digital Scale* (it came with batteries too!)


Will I need parent volunteers to help with these investigations?

None of these investigations are very difficult. Provide your students with written instructions and they shouldn't have too much trouble. If you are the only adult in the room I suggest you spend your time near investigation #2 that has the hot and cold water.


What if I see no difference in mass from weighing the two balloons?

A deflated and inflated balloon only have a difference in mass of about 1 gram. We suggest that you have several balloons blown up to test several. I also suggest that you blow up the balloon as large as you can before it pops.


3rd Grade Matter and Energy Lesson plan cover for NC teachers

Looking for ready-to-use lessons on this topic?


These activities are part of our 3rd Grade Matter Lesson Plans, which include detailed lesson plans, investigations, projects, and many other activities to help students understand matter and energy. Then include student instructional cards for each of the activities above so you can just print and provide to students.

You may also like: Hands-On Heating and Cooling of Matter Activities for Kids


*As an Amazon Associate, we earn from qualifying purchases.

A thunderstorm to teach students about weather
August 18, 2026
Discover a simple way to teach weather by tracking and graphing daily conditions, using real-time data to build vocabulary and science skills.
Elephant toothpaste science experiment producing colorful foam
August 17, 2026
Explore matter, physical and chemical properties, and chemical changes with an exciting elephant toothpaste science experiment for kids.
Students exploring their school during a science scavenger hunt to find real-world examples
August 17, 2026
Discover how science scavenger hunts make hands-on learning easy and engaging, with simple activities for exploring matter, forces, and more.
Students completing a Stroop Effect experiment
August 17, 2026
Try the Stroop Effect for kids! This fun brain experiment explores attention, the nervous system, and how our brains process competing information.
Studnets using open and closed sorting activities to help students classify information
August 16, 2026
Closed sorts vs. open sorts: discover how both strategies help students classify, identify patterns, explain their thinking, and develop deeper science reasoning.
Toy monster truck on top of four  ramps covered with different surfaces— bubble wrap, sandpaper
July 21, 2026
Teach friction with this engaging investigation! Students compare toy car speeds on ramps covered with sandpaper, bubble wrap, and aluminum foil.
ecosystem tri-fold display board created by students for an Ecosystem Expo science project
July 20, 2026
Looking for a meaningful ecosystem project? Learn how to host an Ecosystem Expo where students research biomes, create displays, and present their learning.
Student creating a human body systems poster using craft supplies to model organs and body systems d
July 12, 2026
Discover hands-on human body system projects that help students explore the skeletal, muscular, digestive, respiratory, and more using simple craft supplies.
Variety of balls used in a hands-on force and motion investigation exploring how mass affects an obj
July 6, 2026
Teach force and motion with hands-on science activities that explore how force strength and mass affect movement using simple materials.
Coin resting on an index card over a plastic cup for a hands-on Newton's First Law of Motion
July 6, 2026
Teach Newton's Laws of Motion with quick, hands-on science activities using simple materials. Perfect for engaging elementary students.