Modeling Earth's Landforms and Bodies of Water
What student wouldn’t love to build a model of Earth’s landforms using Play-doh®? How do we make sure science stays at the forefront and it doesn’t become just another “fun activity”. Keep reading to see how students have fun but understand the scientific concepts behind it.
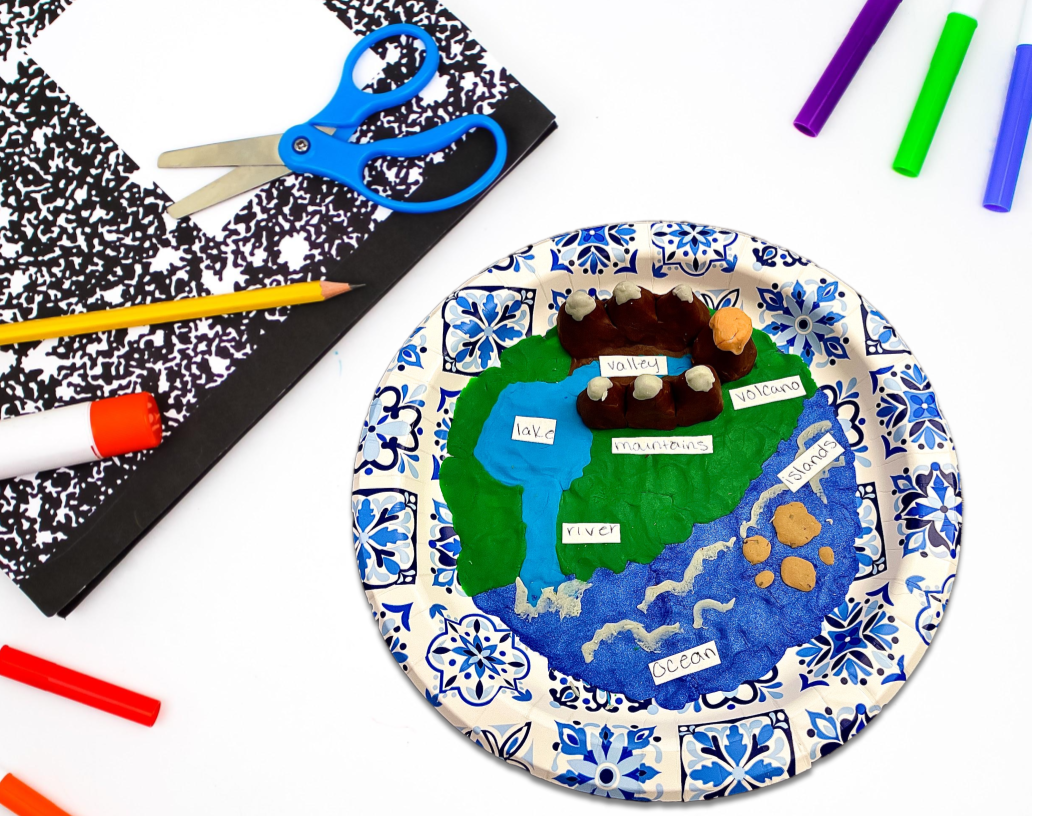
Model Earth's Landforms and Bodies of Water
Time: 1 hour
Materials:
- 8.5 inch paper plates
- Permanent market or pen
- Clay or Play-doh®
- Blank white paper
- Scissors
Steps:
- Students will start by sketching their model idea on the plate.
- Next they will use Clay or Play-doh® to place the bottom layer of grass, dirt or water.
- Then they will build their 3D objects like mountains, volcanoes, caverns, islands, etc.
- Finally, they will use blank paper to write labels for their features. They will cut them out and place them near the feature on their plate.
Students will demonstrate they understand:
- Earth is made up of different types of water.
- Earth is made up of different types of landforms.
- Bodies of water vary in size, shape and depth.
- Rivers and streams often connect to lakes/ponds or the ocean.
- Landforms vary in size, shape and location.
- Valleys and Canyons have rivers that flow through them.
- Islands are surrounded by water.
- Models can represent real-world objects and places.
Putting Science at the Forefront:
To make sure this doesn’t become just another activity, we can push the science by having students answer questions based on their model. Here are a few questions you can require students to answer.
- Which body of water is the largest/smallest?
- Which body of water is the deepest/shallowest?
- Which bodies of water are made of saltwater/freshwater?
- Which landforms are the largest/smallest?
- Which landforms have water nearby?
- Pick two bodies of water/landforms and compare and contrast them.
FAQ
What materials did you use?
You can use paper plates from any store. I’d recommend 8.5 inch so that it’s large enough to show everything but not too large they waste materials.
We used these small *Play-doh® containers. The colors were great and the size was perfect. In our project we used a 10 inch plate (that was too big) and we used 2 brown, 1 dark blue, 1 dark green and very small amounts of the other colors for a total of about 4 ½ containers. If we had used the 8.5 inch container it would have been less.
Before you spend a single dollar of your own money, know that the exact materials listed are not required. Similar items will work just as well! If you decide you'd like the recommended materials, consider asking a few families to donate them, seeing if your school can purchase a class set, or checking with kindergarten teachers who may have extras sitting in a cabinet somewhere. The link above is just a product we used and liked—not a shopping list.
What prior knowledge should students have?
For all of these activities students should have learned the concepts already. These projects are to demonstrate their understanding of what they have been taught. If you follow the 5E instructional model these activities would come after the "Elaborate" section. Interested in what the 5E model is: get my free guide here!
What if I don't have enough clay or Play-Doh® for every student?
To save on materials:
- You can have students work in pairs.
- Teach students to really flatten the grass, dirt and water. It looks like a lot, but if flattened well it’s not much Play-doh®.
- You can have students create 3D mountains, volcanoes or other features with card stock first and then cover it with Play-doh®.
Discover more hands-on ideas, classroom tips, and teaching strategies on the
Coffee and Sneakers blog.
*As an Amazon Associate, we earn from qualifying purchases.